RHEL9 PyTorch 환경 구성
이 문서는 RHEL9 에서 PyTorch를 실행하기 위한 환경을 구성하는 문서이다.
준비작업
당연하게도 PyTorch 를 사용하기위한 NVIDIA Driver, CUDA Driver등은 설치되어있다고 가정한다.
드라이버 설치과정에 대한 내용은 NVIDIA Driver install 문서를 참조하기 바란다.
PyTorch 설치
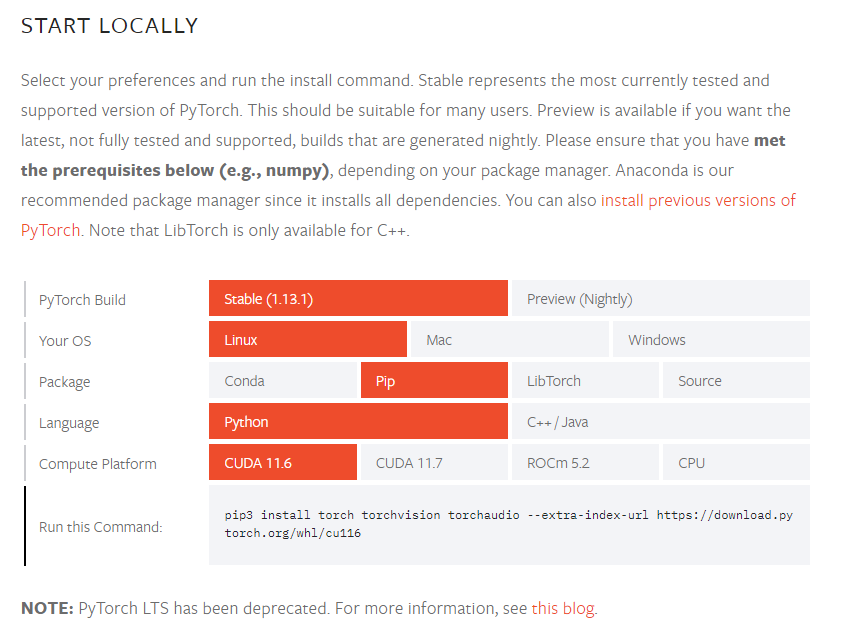
위사이트 링크를 클릭하면 아래와 같은 페이지가 나온다
자신에게 맞는 OS, 패키지, 사용할 프로그래밍 언어, CUDA버전 등을 선택하면 Run this Command라고 되어있는 부분을 복사하여 실행시키면 바로 설치가 된다.
[root@kvm33 ~]# pip3 install torch torchvision torchaudio --extra-index-url https://download.pytorch.org/whl/cu116
Looking in indexes: https://pypi.org/simple, https://download.pytorch.org/whl/cu116
Collecting torch
  Downloading https://download.pytorch.org/whl/cu116/torch-1.13.1%2Bcu116-cp39-cp39-linux_x86_64.whl (1977.9 MB)
     ━━━━━━━━━━━━━━━━━━━━━━━━━━━━━━━━━━━━━━━━ 2.0/2.0 GB 1.5 MB/s eta 0:00:00
Collecting torchvision
  Downloading https://download.pytorch.org/whl/cu116/torchvision-0.14.1%2Bcu116-cp39-cp39-linux_x86_64.whl (24.2 MB)
     ━━━━━━━━━━━━━━━━━━━━━━━━━━━━━━━━━━━━━━━━ 24.2/24.2 MB 10.6 MB/s eta 0:00:00
Collecting torchaudio
  Downloading https://download.pytorch.org/whl/cu116/torchaudio-0.13.1%2Bcu116-cp39-cp39-linux_x86_64.whl (4.2 MB)
     ━━━━━━━━━━━━━━━━━━━━━━━━━━━━━━━━━━━━━━━━ 4.2/4.2 MB 10.2 MB/s eta 0:00:00
Collecting typing-extensions
  Downloading typing_extensions-4.4.0-py3-none-any.whl (26 kB)
Collecting pillow!=8.3.*,>=5.3.0
  Downloading Pillow-9.4.0-cp39-cp39-manylinux_2_28_x86_64.whl (3.4 MB)
     ━━━━━━━━━━━━━━━━━━━━━━━━━━━━━━━━━━━━━━━━ 3.4/3.4 MB 9.9 MB/s eta 0:00:00
Collecting numpy
  Downloading numpy-1.24.1-cp39-cp39-manylinux_2_17_x86_64.manylinux2014_x86_64.whl (17.3 MB)
     ━━━━━━━━━━━━━━━━━━━━━━━━━━━━━━━━━━━━━━━━ 17.3/17.3 MB 10.8 MB/s eta 0:00:00
Requirement already satisfied: requests in /usr/lib/python3.9/site-packages (from torchvision) (2.25.1)
Requirement already satisfied: chardet<5,>=3.0.2 in /usr/lib/python3.9/site-packages (from requests->torchvision) (4.0.0)
Requirement already satisfied: idna<3,>=2.5 in /usr/lib/python3.9/site-packages (from requests->torchvision) (2.10)
Requirement already satisfied: urllib3<1.27,>=1.21.1 in /usr/lib/python3.9/site-packages (from requests->torchvision) (1.26.5)
Installing collected packages: typing-extensions, pillow, numpy, torch, torchvision, torchaudio
Successfully installed numpy-1.24.1 pillow-9.4.0 torch-1.13.1+cu116 torchaudio-0.13.1+cu116 torchvision-0.14.1+cu116 typing-extensions-4.4.0
WARNING: Running pip as the 'root' user can result in broken permissions and conflicting behaviour with the system package manager. It is recommended to use a virtual environment instead: https://pip.pypa.io/warnings/venv
[root@kvm33 ~]# python
Python 3.9.14 (main, Nov  7 2022, 00:00:00)
[GCC 11.3.1 20220421 (Red Hat 11.3.1-2)] on linux
Type "help", "copyright", "credits" or "license" for more information.
>>> import torch
>>> [Ctrl+D]
제대로 설치되어있는지 확인을 위해 아래 샘플 코드를 실행해보자
import torch
import math

print(torch.__version__) # torch version 출력

dtype = torch.float
# device = torch.device("cpu")
device = torch.device("cuda") # Uncomment this to run on GPU, GPU 를 사용하므로 해당 라인 실행

# Create random input and output data
x = torch.linspace(-math.pi, math.pi, 2000, device=device, dtype=dtype)
y = torch.sin(x)

# Randomly initialize weights
a = torch.randn((), device=device, dtype=dtype)
b = torch.randn((), device=device, dtype=dtype)
c = torch.randn((), device=device, dtype=dtype)
d = torch.randn((), device=device, dtype=dtype)

learning_rate = 1e-6
for t in range(2000):
    # Forward pass: compute predicted y
    y_pred = a + b * x + c * x ** 2 + d * x ** 3

    # Compute and print loss
    loss = (y_pred - y).pow(2).sum().item()
    if t % 100 == 99:
        print(t, loss)

    # Backprop to compute gradients of a, b, c, d with respect to loss
    grad_y_pred = 2.0 * (y_pred - y)
    grad_a = grad_y_pred.sum()
    grad_b = (grad_y_pred * x).sum()
    grad_c = (grad_y_pred * x ** 2).sum()
    grad_d = (grad_y_pred * x ** 3).sum()

    # Update weights using gradient descent
    a -= learning_rate * grad_a
    b -= learning_rate * grad_b
    c -= learning_rate * grad_c
    d -= learning_rate * grad_d


print(f'Result: y = {a.item()} + {b.item()} x + {c.item()} x^2 + {d.item()} x^3')
위 내용으로 test-torch.py 파일을 생성후 실행해본다.
[root@kvm33 ~]# python test-torch.py
1.13.1+cu117
99 1212.345703125
199 808.83154296875
299 540.785400390625
399 362.6748962402344
499 244.28729248046875
599 165.57022094726562
699 113.21189880371094
799 78.37323760986328
899 55.18263244628906
999 39.73924255371094
1099 29.450393676757812
1199 22.59251594543457
1299 18.01926040649414
1399 14.967988967895508
1499 12.931051254272461
1599 11.57050895690918
1699 10.661190032958984
1799 10.053071022033691
1899 9.646110534667969
1999 9.373584747314453
Result: y = -0.01189391314983368 + 0.8365795612335205 x + 0.0020518985111266375 x^2 + -0.09046262502670288 x^3
주의사항
샘플용 파일test-torch.py 를 만들때 절대 파일명을 torch.py 로 만들지 않도록 한다.
왜냐하면 이미 torch.py라는 모듈이 존재하기 때문에 같은 이름으로 만들게 되면 import torch 시에 엉뚱하게도 샘플파일이 로딩되어 아래와 같은 오류가 발생할 수 있다.
[root@kvm33 ~]# python
Python 3.9.14 (main, Nov  7 2022, 00:00:00)
[GCC 11.3.1 20220421 (Red Hat 11.3.1-2)] on linux
Type "help", "copyright", "credits" or "license" for more information.
>>> import torch
Traceback (most recent call last):
  File "<stdin>", line 1, in <module>
  File "/root/torch.py", line 4, in <module>    ##### <<<<< 이부분을 보면 엉뚱하게도 /root/torch.py 파일을 로딩하는것을 알수 있다.
    print(torch.__version__) # torch version 출력
AttributeError: partially initialized module 'torch' has no attribute '__version__' (most likely due to a circular import)
>>>
